
Best Magento Installation Tools to Buy in October 2025
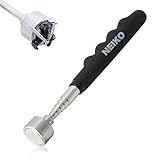
NEIKO 53425A Magnetic Pickup Tool, 25 Lb Telescoping Magnet Tool, 30" Long Extendable Magnet Pick Up Tool, Non-Slip Grip Magnetic Wand, Telescopic Magnet, 7" Short Magnetic Stick, Extra Strong Magnet
-
POWERFUL 25LBS PULLING FORCE FOR EASY RETRIEVAL OF METAL OBJECTS.
-
ADJUSTABLE 7 TO 30 REACH FOR ACCESSING DEEP CREVICES EFFORTLESSLY.
-
SLIM DESIGN FITS TIGHT SPACES; PERFECT FOR MECHANICS AND DIYERS.


GUTIMORE Magnetic Pickup Tool Pack of 2, Flexible Magnetic Pickup 2LB,Telescoping Magnet Pickup 10LB,Strong Magnet for Hard to Reach Keys,Bolts,Nuts and Screws for Car and Home
- REACH ANYWHERE: 25 FLEXIBLE & 30 TELESCOPING TOOLS FOR TOUGH SPOTS.
- STRONG MAGNET: LIFT UP TO 10LBS-IDEAL FOR METAL PIECES RETRIEVAL.
- VERSATILE USE: PERFECT FOR CONSTRUCTION, REPAIRS, AND DIY PROJECTS!

SE 30-inch Telescoping Magnetic Pick-Up Tool, Extendable Magnetic Wand Pickup Tool for Mechanics, Household, Office & Industry, Stainless Steel, Black Handle
-
POWERFUL 15 LBS MAGNET EFFORTLESSLY RETRIEVES LOST METAL ITEMS.
-
TELESCOPING DESIGN ADAPTS TO ANY TIGHT OR HARD-TO-REACH SPACE.
-
ERGONOMIC CUSHION GRIP ENSURES COMFORT DURING PROLONGED USE.
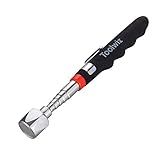
Toolwiz Telescopic Magnetic Pick up Tool (16LB), Extendable to 30 inch Extendable Magnet Pickup Tool, Gifts for Dad, Husband, Grandpa, Handyman Father's Day
- POWERFUL 16 LB MAGNET EFFORTLESSLY RETRIEVES HEAVY METAL ITEMS.
- TELESCOPES FROM 7.2 TO 30 FOR HARD-TO-REACH SPACES.
- COMPACT DESIGN WITH ANTI-SLIP HANDLE FOR COMFORTABLE USE.
To install Magento on 000Webhost, you can follow the steps below:
- Firstly, create an account on 000Webhost and log in to your control panel.
- Once logged in, navigate to the "Website" section and click on "Set Web Address" to add your domain or subdomain.
- Next, click on "Upload Website" to bring up the file manager.
- In the file manager, delete all existing files and folders, as you'll be installing a fresh Magento installation.
- Now, visit the official Magento website and download the latest version of Magento.
- Extract the downloaded Magento package on your computer using a zip extractor.
- After extraction, you'll have a folder containing all the Magento files. Simply compress this folder into a zip file.
- Return to the 000Webhost file manager and upload the Magento zip file to the root directory of your website (public_html). Ensure that the zip file is directly inside the public_html folder, not inside any subfolders.
- Once the upload completes, select the Magento zip file in the file manager and click on "Extract" to unzip the Magento files.
- After extraction, you can delete the Magento zip file from the file manager.
- Now, visit your website's URL in a web browser. The Magento installation wizard should appear.
- Select your preferred language and click on the "Agree and Setup Magento" button.
- Magento will now perform a readiness check to ensure your server meets the requirements. If any issues arise, ensure that your hosting environment meets the necessary prerequisites.
- If the readiness check is successful, click on the "Next" button to proceed.
- Enter the database details for Magento. If you haven't already created a database, you can do so from the 000Webhost control panel under the "Database" section.
- After entering the database details, click on the "Next" button.
- Configure the necessary options like the store name, admin username, password, and encryption key. Provide accurate information to avoid any issues later.
- Click on the "Next" button to continue.
- Magento will now finalize the installation process, which may take a few minutes.
- Once the installation completes, you'll see a success message. Make sure to note down the provided admin URL and admin username/password.
That's it! You have successfully installed Magento on 000Webhost. Access your admin panel using the provided URL and start configuring your online store.
What are the system requirements for installing Magento on 000Webhost?
To install Magento on 000Webhost, you need to ensure that your hosting environment meets the following system requirements:
- PHP version: Magento requires PHP version 7.3 or later. Ensure that your hosting provider offers a compatible PHP version.
- MySQL version: Magento supports MySQL 5.7 or later. Check if your hosting plan includes MySQL and if it meets the required version.
- Web server: Magento is compatible with Apache 2.2 or later, or Nginx 1.x. Make sure your hosting provider offers one of these web servers.
- Disk space: Magento recommends having at least 2GB of disk space for its installation. Check your hosting plan to ensure you have enough space.
- Memory limit: Magento requires a memory limit of at least 2GB. Verify if your hosting provider allows you to increase the memory limit or if it already satisfies this requirement.
It's important to note that 000Webhost is a free hosting service, and sometimes it may have limitations or restrictions that could affect the installation and performance of Magento. Consider reviewing their terms and conditions or contacting their support team for additional information.
How to manage customer accounts in Magento?
To manage customer accounts in Magento, you can follow these steps:
- Log in to your Magento store admin panel.
- Go to the "Customers" tab in the main menu on the left-hand side.
- In the drop-down menu, select "All Customers."
- Here, you will see a list of all your customer accounts.
- To edit a customer account, click on the customer's name or email address.
- In the customer account dashboard, you can view and edit various details such as personal information, addresses, account information, and password.
- You can also create a new customer account by clicking on the "+ Add New Customer" button.
- In the new customer form, fill in the required fields such as name, email, and password.
- Optionally, you can set additional customer attributes like the customer group, default billing address, default shipping address, and more.
- After filling in the details, click on the "Save Customer" button to create the new account.
- You can also delete a customer account by selecting the customer from the list and clicking on the "Delete" button at the top right corner.
- Magento also provides options for managing customer groups, creating customer segments, and assigning customers to specific groups or segments.
- To manage customer groups, go to the "Customers" tab, select "Customer Groups," and you can add, edit, or delete customer groups.
- To manage customer segments, go to the "Customers" tab, select "Customer Segments," and here you can create and manage customer segments based on various attributes like order history, shopping cart value, and more.
By following these steps, you can effectively manage customer accounts in Magento and provide a personalized shopping experience for your customers.
How to set up Google Analytics in Magento?
To set up Google Analytics in Magento, follow these steps:
- Sign in to your Magento admin panel.
- Go to the "Stores" tab and click on "Configuration."
- From the left navigation menu, under "Sales," click on "Google API."
- Expand the "Google Analytics" section.
Option 1: Using the Universal Analytics (recommended):
- Set "Enable" to "Yes" and enter your Google Analytics Account Number.
- Click on "Save Config."
Option 2: Using the Google Tag Manager:
- Set "Enable" to "Yes."
- Click on "Choose implementation" and select "Google Tag Manager."
- Enter your Google Tag Manager Container ID.
- Click on "Save Config."
Once you have completed the setup, Magento will start collecting data and sending it to your Google Analytics account. It may take some time for the data to appear in your Google Analytics dashboard.
What is a cron job and how to set it up for Magento?
A cron job is a scheduled task or script that runs automatically at predefined intervals on a server. It is commonly used to perform tasks such as backups, database maintenance, or updating data.
In the context of Magento, cron jobs are essential for running various system tasks periodically, including sending newsletters, generating sitemaps, indexing, and other administrative tasks.
To set up a cron job for Magento, follow these steps:
- Access your server control panel or connect to your server via SSH.
- Locate the crontab file. It is usually located at /etc/crontab or /var/spool/cron/crontabs.
- Open the crontab file in an editor.
- Add the following line to the crontab file, specifying the frequency (in minutes) at which you want the cron job to run: */5 * * * * php -f /path/to/magento/bin/magento cron:run >/dev/null 2>&1 This example sets the cron job to run every 5 minutes. Adjust the frequency according to your needs.
- Save the changes to the crontab file.
- Restart the cron service to apply the changes. The command may vary depending on your server setup: sudo service cron restart or sudo systemctl restart cron
The cron job is now set up for Magento. It will execute the specified Magento command every time the scheduled interval is reached. Make sure to replace "/path/to/magento" with the actual path to your Magento installation directory.