
Best Electric Scooter Repair Kits to Buy in November 2025

Bicycle Repair Bag With Tire Pump, Portable Tool Kit for Camping Travel - Bike Glueless Patches, Maintenance Essentials All in One Safety Kit
- ALL-IN-ONE KIT FOR EMERGENCY BIKE REPAIRS AT HOME OR ON-THE-GO.
- MINI PUMP AND GLUELESS PATCHES ENSURE QUICK FIXES ANYWHERE.
- VERSATILE TOOLS FOR ALL BIKE TYPES; PERFECT GIFT FOR CYCLING LOVERS!


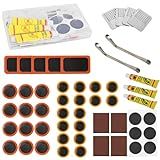
xflyxin Bicycle Tire Repair Kit, Bicycle Inner Tube Repair Kit - Contains 39 Patches, Metal Lever, Suitable for Motorcycle Electric Bicycle Scooter Mountain MTB BMX Bike
-
FIX FLAT TIRES QUICKLY WITH 6 PRE-COATED PATCHES FOR EASY REPAIRS.
-
39 PATCHES IN VARIOUS SIZES TACKLE PUNCTURES OF ALL KINDS EFFORTLESSLY.
-
LIGHTWEIGHT, PORTABLE KIT ENSURES YOU’RE READY FOR ANY BIKING ADVENTURE.
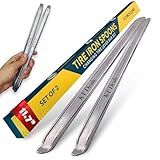
KT Deals Tire Iron Spoons Changing Tire Lever Bar Set Repair Tool Kit Tyre Changer Remover Heavy Duty Metal Steel for Motorcycle Bike Scooter Bicycle Mower (2pc 11.7 INCH)
- COMPACT & PORTABLE: EASY TO CARRY; PERFECT FOR ON-THE-GO REPAIRS.
- DURABLE & STRONG: MADE FROM HEAT-TREATED FORGED STEEL FOR LASTING USE.
- EFFORTLESS TIRE CHANGE: DESIGNED FOR EASY TIRE REMOVAL AND INSTALLATION.
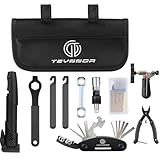
Teyssor Bike Repair Bag with Tire Pump, Bicycle Tire Repair Tool Kit, Portable Tool Bag with 16 in 1 Multitool All in One Bike Kit for Cycling
- ALL-IN-ONE TOOL KIT: 16 TOOLS FOR EVERY BIKE REPAIR NEED IN ONE KIT.
- FAST INFLATION PUMP: 120 PSI PUMP FOR QUICK, EFFORTLESS TIRE FIXES.
- WATERPROOF & PORTABLE: DURABLE BAG KEEPS TOOLS SAFE ON ANY RIDE.

WOTOW Bike Repair Tool Kit, 16 in 1 Bicycle Multitool with Tire Levers Hex Spoke Wrench, Multi Function Accessories Set for Road Mountain Bikes
- DURABLE CHROME-VANADIUM STEEL ENSURES LONGEVITY AND RELIABILITY.
- ALL-IN-ONE TOOL KIT BACKS CYCLISTS WITH ESSENTIAL MAINTENANCE TOOLS.
- ULTRA-COMPACT DESIGN FITS EASILY IN POCKETS OR SADDLE BAGS.
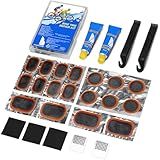
Beanewone Bike Tire Repair Kit, Bicycle Inner Tube Patch Kit with 18PCS Tube Patches, Tire Levers & Repair Glue – Portable Case for Bicycle & Inflatable Tubes (Tire Repair Kit)
- QUICK 10-MIN ROADSIDE REPAIRS WITH HIGH-STRENGTH GLUE FOR CONVENIENCE.
- COMPACT 3OZ KIT FITS EASILY IN POCKETS FOR TRAVEL AND OUTDOOR USE.
- UNIVERSAL COMPATIBILITY WORKS ON BIKES, EBIKES, MOTORCYCLES, AND MORE!
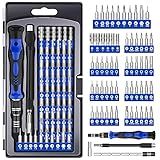
XOOL 62 in 1 Precision Screwdriver Kit, Electronics Repair Tool Kit, Magnetic Driver Kit with Flexible Shaft, Extension Rod for Mobile Phone, Smartphone, Game Console, PC, Tablet
- COMPREHENSIVE 62-IN-1 KIT: INCLUDES 58 BITS FOR VERSATILE REPAIRS.
- DURABLE QUALITY MATERIALS: CRAFTED FROM HIGH-STRENGTH CR-V STEEL.
- ERGONOMIC DESIGN: COMFORTABLE GRIP FOR EASY, LONG-TIME USE.
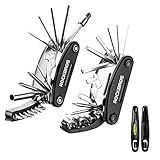
ROCKBROS 16 In 1 Multi-Function Bike Tool Kit - Portable Foldable Bike Multitool Cycling Tool Kit With Allen Wrench, Tire Levers
-
COMPACT & PORTABLE: FITS EASILY IN YOUR BAG OR POCKET FOR CONVENIENCE.
-
VERSATILE 16-IN-1 TOOLS: HANDLE ALL REPAIRS, CYCLING OR HOUSEHOLD.
-
DURABLE STEEL CONSTRUCTION: BUILT TO LAST, ENSURING EFFECTIVE REPAIRS.
Basic repairs on an electric scooter for girls can involve tasks such as replacing a damaged tire, checking and changing the brake pads, adjusting the handlebars or seat height, and tightening loose screws or bolts. To replace a tire, you will need to remove the wheel and tire, replace the inner tube if necessary, and then reassemble the wheel. To check and change the brake pads, you will need to remove the old pads, replace them with the new ones, and adjust the tension if needed. Adjusting the handlebars or seat height can typically be done by loosening the bolts holding them in place, adjusting to the desired height, and then tightening the bolts back in place. Lastly, tightening loose screws or bolts will involve identifying the loose ones, using the appropriate tools to tighten them, and ensuring that all parts are securely fastened. These basic repairs can help ensure the safety and proper functioning of the electric scooter for girls.
What is the procedure for replacing a damaged motor on an electric scooter?
Here is a general procedure for replacing a damaged motor on an electric scooter:
- Start by turning off the power and unplugging the scooter from any power source.
- Locate the damaged motor on the scooter. It is usually located near the rear wheel in most electric scooters.
- Remove any external covers or panels that may be obstructing access to the motor.
- Disconnect the motor from the wiring harness by unplugging the connectors.
- Remove the mounting screws or bolts that are holding the motor in place. Keep track of these screws or bolts as you will need them to secure the new motor.
- Carefully pull out the old motor from its position, being mindful of any wires or cables that may still be attached.
- Insert the new motor into the same position as the old one and secure it in place with the mounting screws or bolts.
- Reconnect the wiring harness to the new motor by plugging in the connectors.
- Double-check all connections and make sure everything is secure before reattaching any covers or panels that were removed.
- Turn the power back on and test the scooter to ensure that the new motor is functioning properly.
If you are not comfortable or experienced with these types of repairs, it is recommended to seek professional help from a certified technician or repair service to replace the damaged motor on your electric scooter.
What is the best method for tightening loose handlebar grips on an electric scooter?
To tighten loose handlebar grips on an electric scooter, the best method is to use some adhesive such as hairspray or grip glue. Here's a step-by-step guide:
- First, remove the loose grip from the handlebar.
- Clean both the handlebar and the inside of the grip to remove any dirt or residue.
- Apply a small amount of adhesive (hairspray or grip glue) to the inside of the grip.
- Quickly slide the grip back onto the handlebar and twist it into the desired position. Make sure it is securely in place.
- Wipe away any excess adhesive that may have squeezed out.
- Let the adhesive dry completely before using the scooter.
This method will help secure the grip in place and prevent it from slipping or coming loose during use. Remember to use a small amount of adhesive to avoid creating a mess and to ensure that the grip can still be removed easily in the future if needed.
What is the correct way to store an electric scooter?
- Before storing your electric scooter, make sure it is clean and dry to prevent any rust or corrosion.
- Remove the battery from the scooter and store it in a cool, dry place. Make sure to keep it charged to about 50% to extend its lifespan.
- Fold or collapse the scooter, if it is foldable, to save space and prevent any damage to the frame.
- Store the scooter in a cool, dry place away from direct sunlight or extreme temperatures.
- If storing the scooter for an extended period of time, it is a good idea to periodically check on it to ensure everything is still in good condition.
- Consider covering the scooter with a protective cover to prevent dust and debris from accumulating on it.
- Make sure to follow any specific storage instructions provided by the manufacturer of your electric scooter.
How to troubleshoot electrical issues on an electric scooter?
- Check the power source: Make sure that the electric scooter is properly connected to a power source and that the outlet is working. If the power source is functioning correctly, move on to the next step.
- Inspect the battery: Check the battery of the electric scooter to ensure that it is fully charged and properly connected. If the battery is not holding a charge or is damaged, it may need to be replaced.
- Check the wiring: Inspect the wiring of the electric scooter for any loose or damaged connections. Make sure that all wires are properly connected and secure.
- Test the motor: Check the motor of the electric scooter to ensure that it is functioning properly. Test the motor by turning on the scooter and listening for any unusual noises or vibrations.
- Test the controller: The controller is responsible for regulating the speed and power of the electric scooter. Test the controller by checking for any error codes or malfunctions.
- Contact the manufacturer: If you are unable to troubleshoot the electrical issues on your electric scooter, contact the manufacturer for further assistance. They may be able to provide troubleshooting tips or recommend a professional repair service.